>_Programming Partner
Loading technical insights...
Loading technical insights...
Software Developer
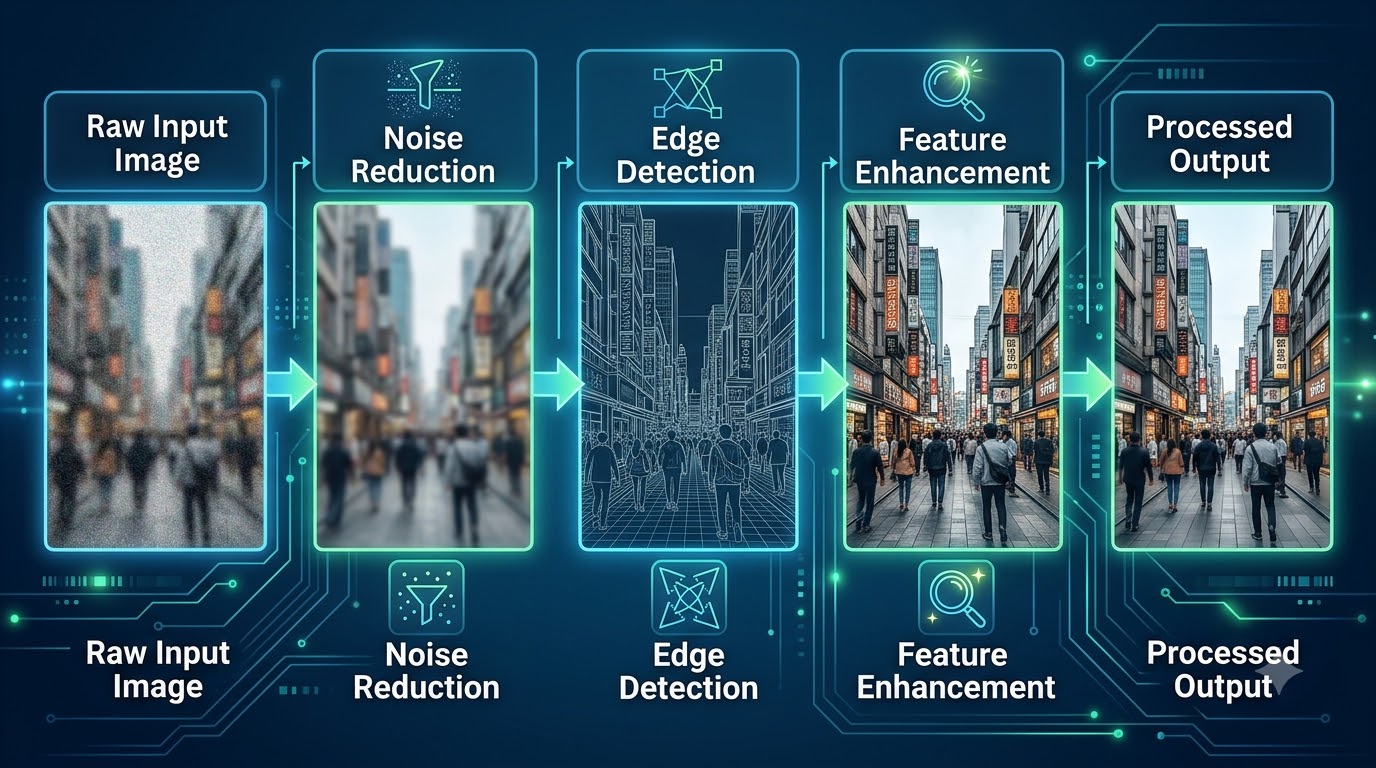
Before artificial intelligence can accurately recognize objects, faces, or scenes, images often require crucial preparation. This initial, often overlooked, step is known as image processing. It acts as the unsung hero, laying the groundwork for successful computer vision systems.
Image processing involves cleaning, enhancing, and transforming raw visual data. This optimization ensures that subsequent AI models receive the highest quality input possible. High-quality input is paramount for achieving high-accuracy output in any AI application.
Image processing is a technique for manipulating and analyzing digital images. Its primary goal is to improve image quality, extract useful information, or transform images into a more suitable format for specific tasks.
Crucially, image processing focuses on modifying the image itself at a pixel level. It does not interpret the semantic content of the image, unlike computer vision. Instead, it prepares the image for such interpretation.
Poor-quality, noisy, or inconsistent images can severely degrade the performance and accuracy of computer vision models. Imagine trying to identify a blurry object in a dimly lit photo; even humans struggle with such tasks.
Effective preprocessing, through image processing, improves image quality and removes unwanted noise. It corrects distortions and highlights important features. This robust foundation is essential for accurate AI analysis.
For instance, noise or blur can confuse a model, causing it to misclassify objects or fail to detect them entirely. Image processing ensures clarity, making the AI's job much easier and more reliable.
While often used interchangeably, image processing and computer vision are distinct yet complementary fields. Image processing is the foundational step, while computer vision builds upon it to achieve higher-level understanding.
Image processing focuses on enhancing or transforming images at a pixel level. Computer vision, on the other hand, aims to interpret and understand the content of images, enabling machines to 'see' and make decisions.
| Aspect | Image Processing | Computer Vision |
|---|---|---|
| Primary Goal | Enhance, transform, or extract low-level features from images | Interpret, understand, and make decisions based on image content |
| Focus Level | Pixel-level manipulation | Object-level, scene-level understanding |
| Typical Techniques | Filtering, noise reduction, enhancement, geometric transformations | Object detection, recognition, tracking, 3D reconstruction, scene understanding |
| Output | Processed image, feature maps, enhanced data | Labels, classifications, bounding boxes, semantic segmentation, decisions |
| Relationship | Foundation for computer vision | Utilizes image processing as a prerequisite |
Digital images are fundamentally composed of tiny individual units called pixels. Each pixel stores specific color or intensity information, acting as the smallest building block of the visual data.
Image resolution defines the width and height of an image in pixels (e.g., 1920x1080). Higher resolution means more pixels, leading to greater detail and clarity in the image.
Color images typically use RGB (Red, Green, Blue) channels, where each pixel has three values representing the intensity of these primary colors. Grayscale images, in contrast, use a single intensity value per pixel.
Color depth, often expressed in bits (e.g., 8-bit, 24-bit), determines the number of distinct colors a pixel can represent. An 8-bit grayscale image can show 256 shades, while a 24-bit RGB image can display over 16 million colors.
Image processing typically follows a sequential workflow, often referred to as the image processing pipeline. Each stage contributes to preparing the image for successful computer vision tasks.
The pipeline begins with image acquisition, which involves capturing the image using sensors like cameras or scanners. This raw input then moves to preprocessing, where it is cleaned and normalized.
Next comes feature enhancement, improving the visibility of important features. This is followed by feature extraction, where meaningful patterns are identified. Finally, output generation produces the processed image or data.
A wide array of techniques falls under image processing, each serving a specific purpose in preparing images for analysis. Understanding these methods is key to effective computer vision.
Common techniques include resizing to change dimensions, cropping to select a region of interest, and geometric transformations like rotation and flipping. These adjust the image's spatial properties.
Intensity-based methods like thresholding convert images to binary, while filtering methods (e.g., blurring, sharpening) modify pixel values based on their neighbors. Edge detection highlights boundaries, and histogram equalization enhances contrast.
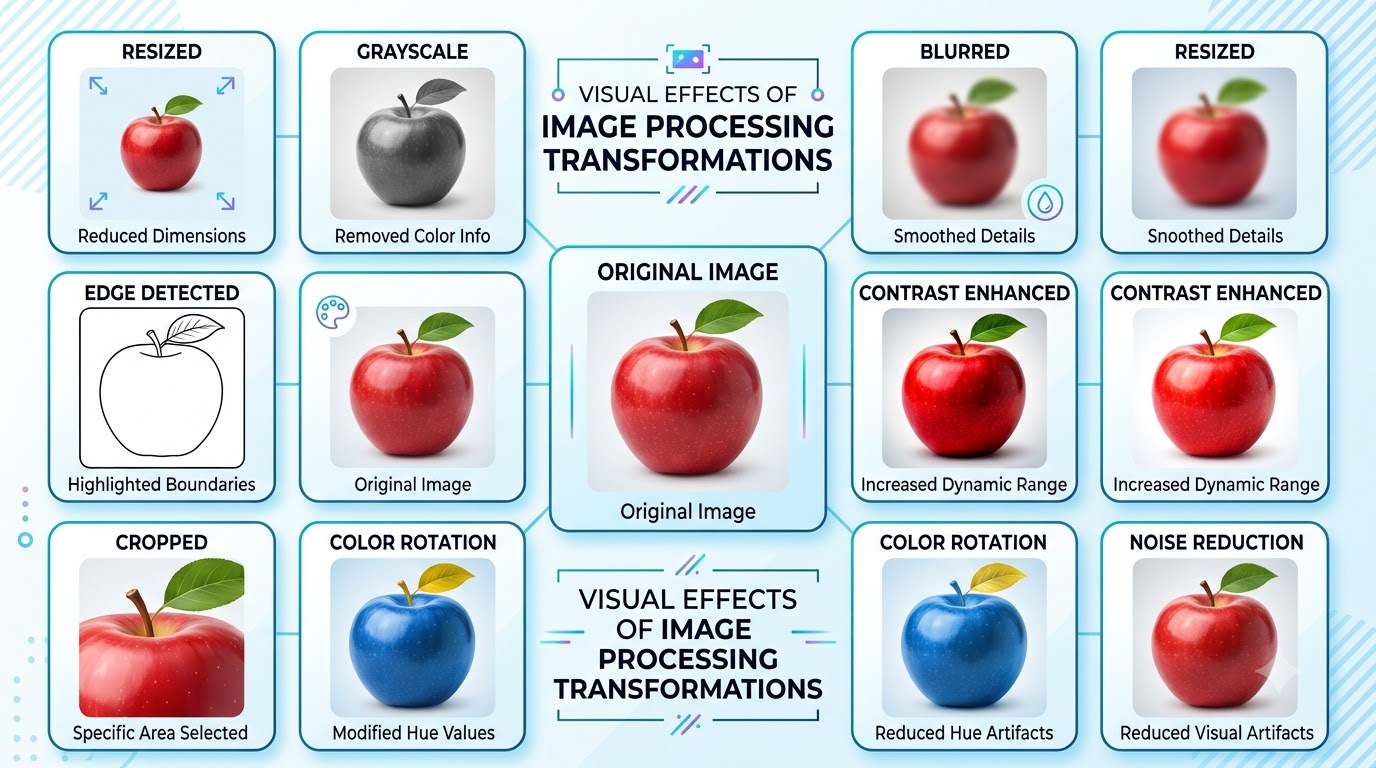
Preprocessing is a critical phase in the image processing pipeline, focusing on preparing raw images for subsequent analysis. It addresses inconsistencies and imperfections inherent in captured data.
Key preprocessing methods include noise reduction, which removes unwanted pixel variations, and image normalization, which scales pixel values to a consistent range. Brightness and contrast adjustment optimize visual clarity.
Resizing images to a standard dimension and converting them to grayscale are also common steps. Achieving consistent image quality and format is crucial before feeding images into machine learning or deep learning models for training or inference.
Image noise refers to random variations of brightness or color information in images, often introduced during acquisition or transmission. Common types include Gaussian noise, Salt-and-Pepper noise, and Speckle noise.
Various filters are employed to remove these unwanted distortions while preserving important image details. Each filter has specific strengths depending on the type of noise present.
Gaussian Blur uses a Gaussian function to smooth images, effectively reducing Gaussian noise. The Median Filter is excellent for removing Salt-and-Pepper noise by replacing pixel values with the median of their neighbors. The Bilateral Filter smooths images while preserving edges, making it ideal for maintaining detail.
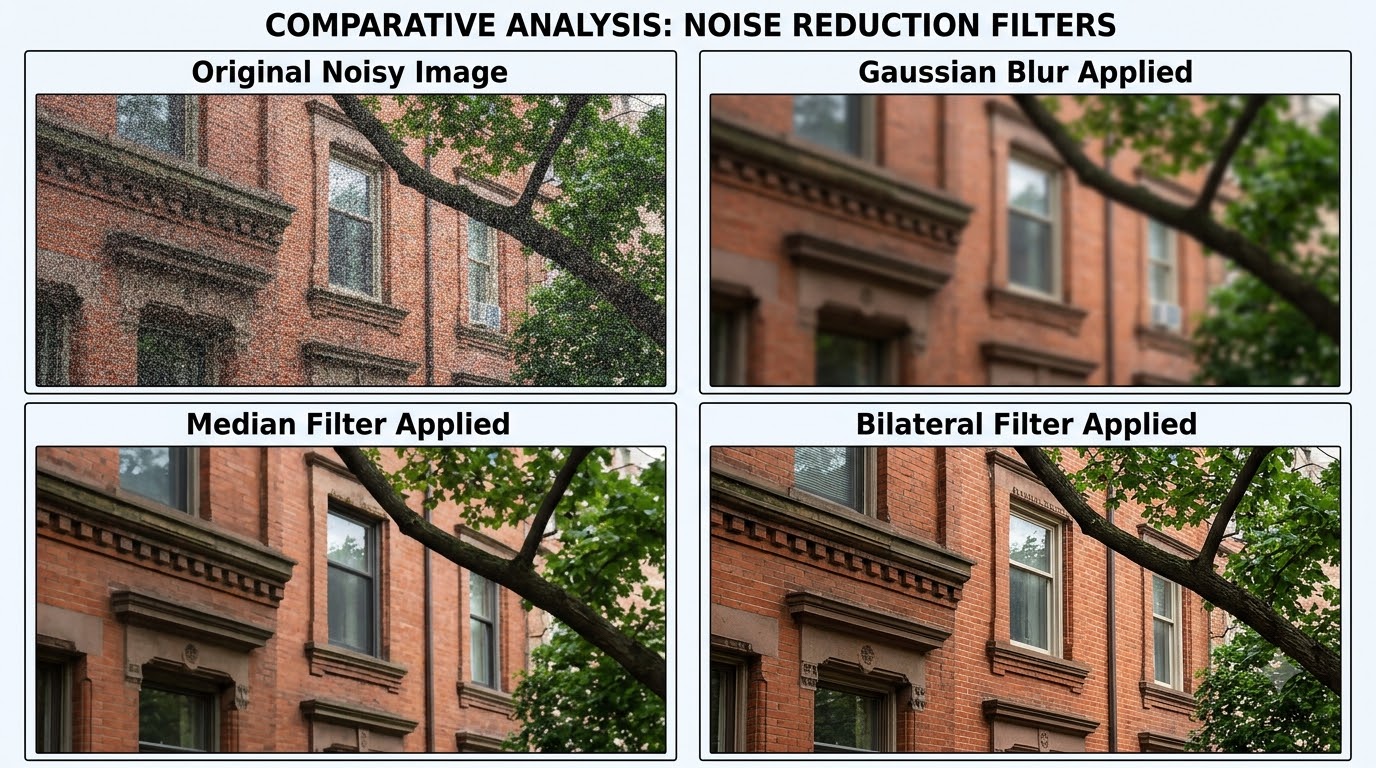
Image enhancement techniques are designed to improve the visual quality and interpretability of images. These methods make features more discernible for both human observers and computer vision algorithms.
Contrast enhancement increases the difference between light and dark areas, making details stand out. Image sharpening, conversely, accentuates fine details and edges, making the image appear crisper.
Histogram equalization redistributes pixel intensities to achieve a more uniform histogram, thereby improving overall contrast, especially in images with limited dynamic range. Adaptive histogram equalization performs this locally for better results.
Gamma correction adjusts the overall brightness and contrast of an image by applying a non-linear transformation. These methods collectively help reveal hidden details and improve clarity.
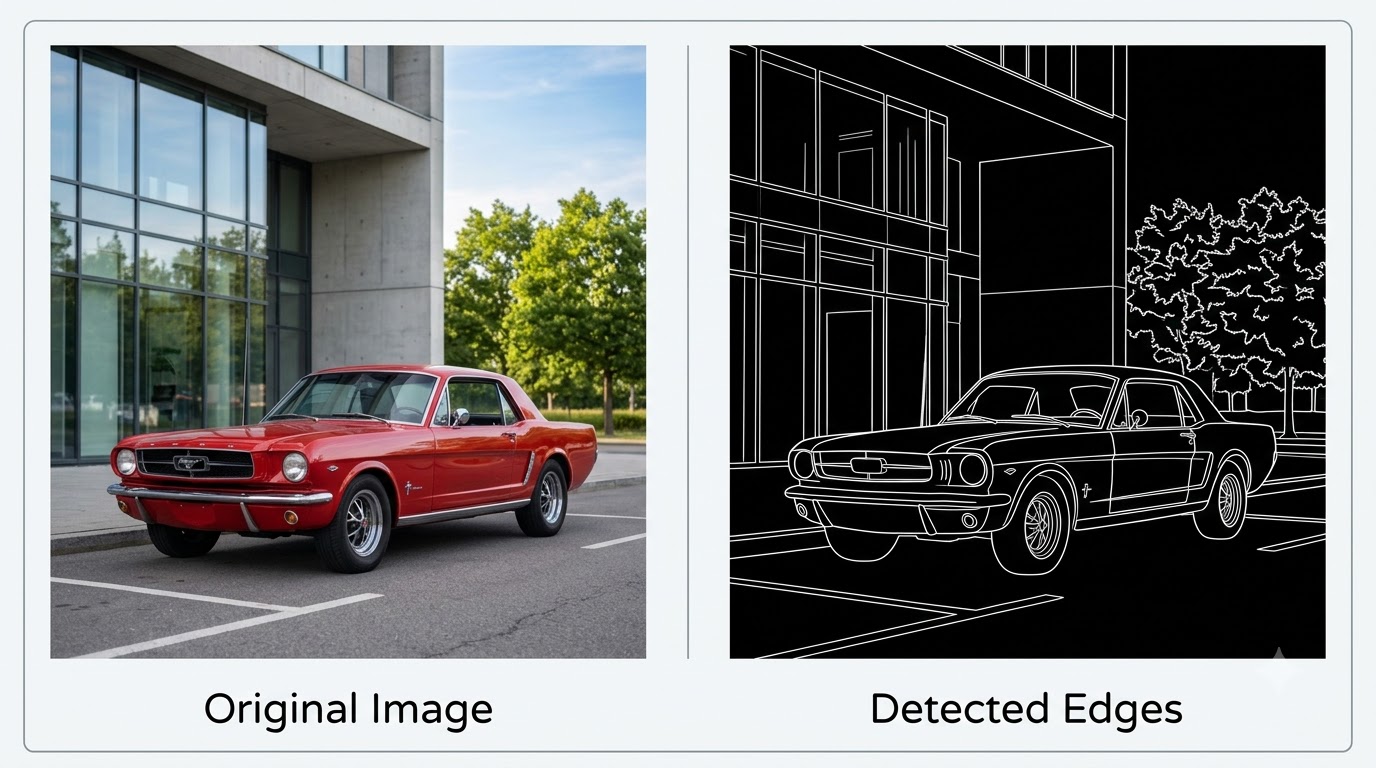
Edge detection is a fundamental technique for identifying significant changes in image intensity. These changes typically correspond to object boundaries, contours, or transitions between different regions.
Popular algorithms like Sobel, Canny, and Laplacian are used for edge detection. The Sobel operator detects edges by calculating the gradient of image intensity, highlighting strong changes.
The Canny algorithm is renowned for its robustness, providing good localization and minimizing false positives. It involves multiple stages, including noise reduction, gradient calculation, non-maximum suppression, and hysteresis thresholding.
Edge detection is crucial in feature extraction and object recognition tasks. It simplifies image data by focusing on structural properties, making it easier for computer vision models to identify and analyze objects.
Thresholding is a simple yet powerful technique used to separate foreground objects from the background in an image. It works by converting a grayscale image into a binary image.
Pixels with intensity values above a certain threshold are assigned one value (e.g., white), and those below are assigned another (e.g., black). Simple global thresholding uses a single threshold for the entire image.
Adaptive thresholding, in contrast, calculates different thresholds for different regions of the image, making it more effective for images with varying lighting conditions. This helps isolate objects more accurately.
Image segmentation is a broader concept that partitions an image into multiple segments or regions of interest. It is useful for isolating specific objects or areas for further analysis in computer vision, such as identifying tumors in medical scans or individual cars on a road.
Beyond the familiar RGB (Red, Green, Blue) color space, several other color spaces are crucial in image processing. Each offers a different way to represent color information, optimized for specific tasks.
Grayscale represents images using only shades of gray, simplifying data and often used for algorithms that don't require color information. HSV (Hue, Saturation, Value) separates color (hue) from its intensity (value) and purity (saturation).
HSV is particularly useful for color-based object detection, as hue is less sensitive to lighting changes. LAB (Lightness, a-component, b-component) is designed to approximate human vision, separating lightness from color information.
LAB is often used for color correction and robust color filtering under varying lighting conditions. Choosing the right color space can significantly improve the performance of computer vision algorithms for tasks like skin tone analysis or object tracking.
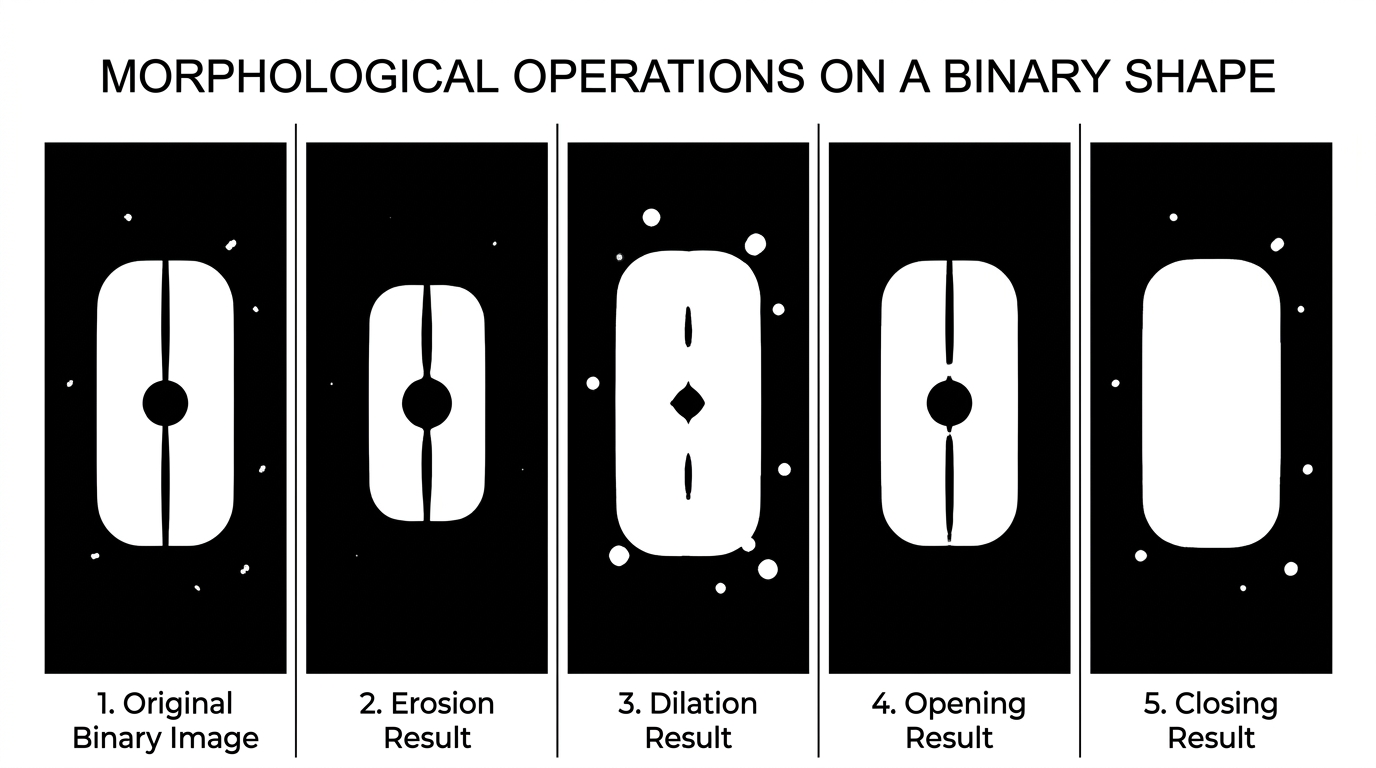
Morphological operations are a set of non-linear operations primarily used on binary images to process shapes. They are based on set theory and are highly effective for refining detected objects.
Core operations include erosion, which shrinks foreground objects, and dilation, which expands them. Erosion can remove small imperfections or noise, while dilation can fill small holes or connect broken parts.
Opening is an erosion followed by a dilation, used to remove small objects and smooth contours without significantly changing the overall size. Closing is a dilation followed by an erosion, used to fill small holes and connect nearby objects.
These techniques are invaluable after thresholding or segmentation to clean up binary masks, smooth boundaries, and prepare objects for accurate measurement or recognition. They help in refining the structural representation of objects.
Feature extraction is the process of identifying meaningful patterns, distinctive points, or characteristics within an image. These features help computer vision models distinguish and identify objects effectively.
Traditional feature descriptors like SIFT (Scale-Invariant Feature Transform) and HOG (Histogram of Oriented Gradients) extract robust features such as edges, corners, and textures. SIFT is invariant to scale and rotation, making it powerful for object recognition.
HOG focuses on the distribution of edge orientations, commonly used in pedestrian detection. These hand-crafted features were once the backbone of many computer vision systems.
In contrast, deep learning models, particularly Convolutional Neural Networks (CNNs), automatically learn hierarchical features directly from raw image data. These 'convolutional features' are often more powerful and adaptable than traditional descriptors.
Several open-source libraries and frameworks are widely used for image processing, providing powerful tools for developers. These libraries simplify complex operations and accelerate development.
OpenCV (Open Source Computer Vision Library) is a highly optimized library offering a vast array of algorithms for image processing and computer vision. It supports multiple programming languages, including Python and C++.
Pillow, a fork of the Python Imaging Library (PIL), is a user-friendly library for basic image manipulation tasks like resizing, cropping, and format conversion. It's excellent for general-purpose image handling.
Scikit-image is a collection of algorithms for image processing in Python, built on NumPy and SciPy. It provides functions for segmentation, geometric transformations, feature detection, and more. ImageIO offers a simple interface to read and write a wide range of image data formats.
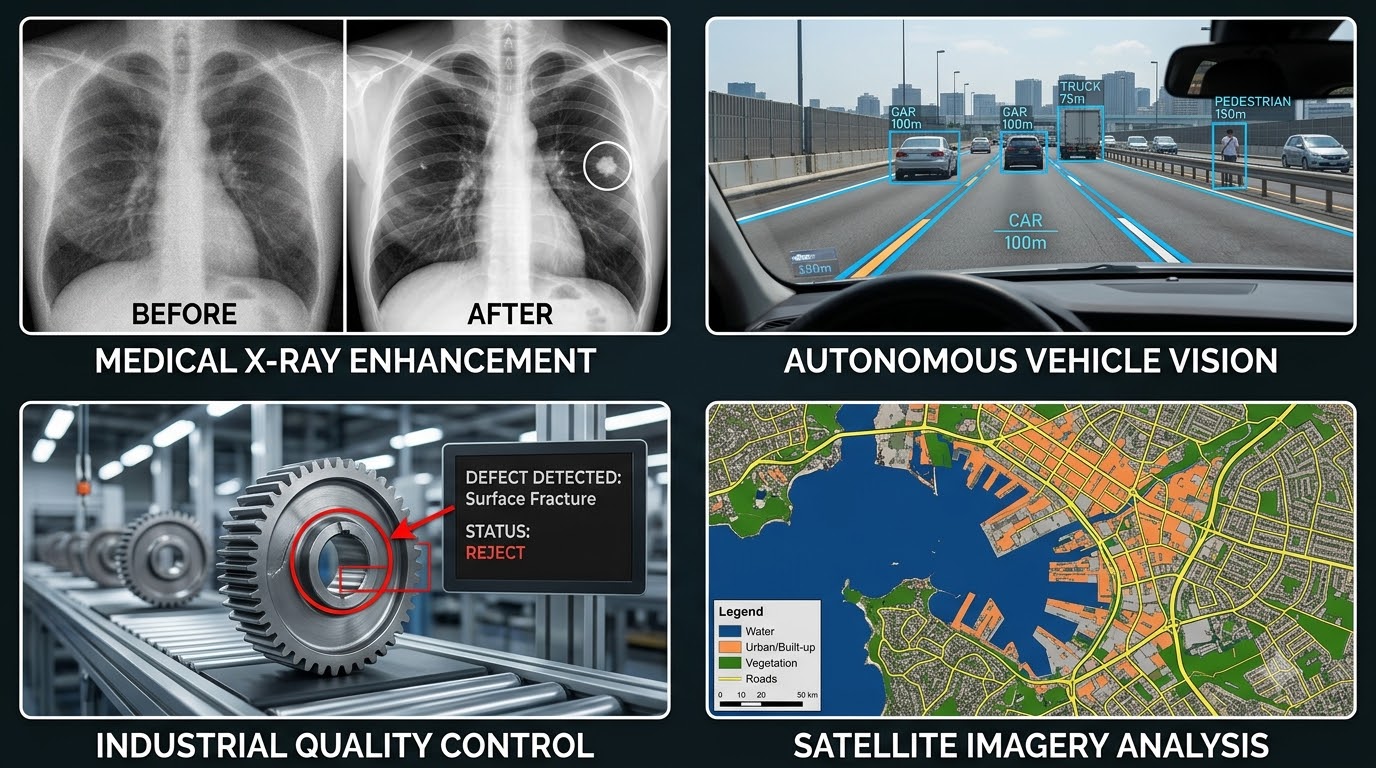
Image processing is not just an academic concept; it underpins countless real-world applications across various industries. It serves as the foundational layer before AI performs higher-level analysis.
In medical imaging, it enhances X-rays and MRIs to highlight anomalies, aiding diagnosis. Document scanning uses it for OCR preprocessing, cleaning text for accurate recognition. Facial recognition systems rely on it for alignment and normalization of faces.
Autonomous vehicles use image processing to enhance road signs and lane markings under diverse conditions. Satellite imagery analysis benefits from it for noise reduction and feature enhancement before environmental monitoring or urban planning.
Industrial quality inspection systems use it to detect defects on production lines, and security surveillance systems employ it for motion detection and object tracking. These diverse applications demonstrate its pervasive impact.
Despite its power, image processing comes with its own set of challenges. Understanding these can help in designing more robust and effective computer vision systems.
Varying lighting conditions, from bright sunlight to dim interiors, can drastically alter image appearance. Motion blur, caused by camera or object movement, can obscure details. Low resolution images inherently lack information.
Inherent image noise, occlusions (partial blocking of objects), and changing backgrounds further complicate processing. These factors can significantly affect image quality and, consequently, the performance of downstream computer vision models.
Careful selection and tuning of processing techniques are essential to mitigate these challenges. Often, a combination of methods is required to achieve optimal results across different scenarios.
Python, with its rich ecosystem of libraries, is a popular choice for image processing tasks. OpenCV, in particular, offers a comprehensive toolkit for both basic and advanced operations.
This hands-on section will guide you through a typical workflow: loading an image, applying several preprocessing techniques, visualizing intermediate and final results, and saving the processed output. This practical example will solidify your understanding.
Before diving into code, ensure your Python environment is set up with the necessary libraries. We will be using OpenCV for image processing and Matplotlib for displaying images.
pip install opencv-python matplotlib numpyYou can verify the installation by trying to import the libraries in a Python interpreter. If no errors occur, you are ready to proceed with the image processing examples.
import cv2
import matplotlib.pyplot as plt
import numpy as np

print("OpenCV, Matplotlib, and NumPy installed successfully!")The first step in any image processing task is to load the image into memory. OpenCV's imread function is used for this purpose, and Matplotlib helps in displaying it.
Remember that OpenCV loads images in BGR format by default, while Matplotlib expects RGB. We'll convert it for correct display.
import cv2
import matplotlib.pyplot as plt
import numpy as np

# Ensure you have an image file named 'sampleᵢmage.jpg' in the same directory
# For demonstration, you can use any image. Example: a simple landscape or object photo.

# Load the image
image_path = 'sampleᵢmage.jpg'
originalᵢmage = cv2.imread(image_path)

# Check if image was loaded successfully
if originalᵢmage is None:
    print(f"Error: Could not load image from {image_path")
else:
    # Convert BGR to RGB for Matplotlib display
    rgbᵢmage = cv2.cvtColor(originalᵢmage, cv2.COLOR_BGR2RGB)

    # Display the original image
    plt.figure(figsize=(8, 6))
    plt.imshow(rgbᵢmage)
    plt.title('Original Image')
    plt.axis('off') # Hide axes for cleaner display
    plt.show()

    # Print basic image properties
    print(f"Image shape: {originalᵢmage.shape") # (height, width, channels)
print(f"Image data type: {originalᵢmage.dtype") # e.g., uint8Converting an image to grayscale simplifies its data by removing color information, which can be beneficial for algorithms that only rely on intensity. Resizing standardizes image dimensions.
These steps ensure consistency across different input images, which is crucial for training machine learning models. We will resize the image to a common dimension, for example, 200x200 pixels.
import cv2
import matplotlib.pyplot as plt
import numpy as np

# Continued from previous block - requires the 'originalᵢmage' variable

if 'originalᵢmage' in locals() and originalᵢmage is not None:
    # Convert to grayscale
    grayᵢmage = cv2.cvtColor(originalᵢmage, cv2.COLOR_BGR2GRAY)

    # Resize the image to a standard dimension (e.g., 200x200 pixels)
    target_size = (200, 200)
    resizedᵢmage = cv2.resize(originalᵢmage, target_size, interpolation=cv2.INTER_AREA)
    # Note: resized_grayᵢmage is not used in display, but shown for completeness
    resized_grayᵢmage = cv2.resize(grayᵢmage, target_size, interpolation=cv2.INTER_AREA)

    # Convert resized color image to RGB for display
    resized_rgbᵢmage = cv2.cvtColor(resizedᵢmage, cv2.COLOR_BGR2RGB)

    # Display processed images
    plt.figure(figsize=(12, 6))

    plt.subplot(1, 3, 1)
    plt.imshow(cv2.cvtColor(originalᵢmage, cv2.COLOR_BGR2RGB)) # Convert original for display
    plt.title('Original Image')
    plt.axis('off')

    plt.subplot(1, 3, 2)
    plt.imshow(grayᵢmage, cmap='gray')
    plt.title('Grayscale Image')
    plt.axis('off')

    plt.subplot(1, 3, 3)
    plt.imshow(resized_rgbᵢmage)
    plt.title(f'Resized Image {target_size')
    plt.axis('off')

    plt.show()

    print(f"Grayscale image shape: {grayᵢmage.shape")
    print(f"Resized image shape: {resizedᵢmage.shape")
else:
print("Original image not loaded. Please run the previous block first.")Noise can significantly hinder the performance of computer vision algorithms. Gaussian blur is a common and effective filter for reducing random noise while smoothing the image.
The cv2.GaussianBlur function takes the image, a kernel size (width, height), and the standard deviation in X and Y directions. A larger kernel size results in more blurring.
import cv2
import matplotlib.pyplot as plt
import numpy as np

# Continued from previous block - requires the 'originalᵢmage' variable

if 'originalᵢmage' in locals() and originalᵢmage is not None:
    # Apply Gaussian blur for noise reduction
    # Kernel size (ksize) must be odd and positive (e.g., (5, 5))
    # sigmaX is the standard deviation in X direction (0 means calculated from ksize)
    blurredᵢmage = cv2.GaussianBlur(originalᵢmage, (5, 5), 0)

    # Convert blurred image to RGB for display
    blurred_rgbᵢmage = cv2.cvtColor(blurredᵢmage, cv2.COLOR_BGR2RGB)

    # Display original and blurred images
    plt.figure(figsize=(10, 5))

    plt.subplot(1, 2, 1)
    plt.imshow(cv2.cvtColor(originalᵢmage, cv2.COLOR_BGR2RGB))
    plt.title('Original Image')
    plt.axis('off')

    plt.subplot(1, 2, 2)
    plt.imshow(blurred_rgbᵢmage)
    plt.title('Gaussian Blurred Image')
    plt.axis('off')

    plt.show()
else:
print("Original image not loaded. Please run the previous blocks first.")Edge detection is crucial for identifying object boundaries, which are vital features for many computer vision tasks. The Canny algorithm is widely used for its effectiveness.
It takes a grayscale image and two threshold values: threshold1 and threshold2. Edges with intensity gradient greater than threshold2 are sure edges, and those below threshold1 are discarded.
Edges between threshold1 and threshold2 are considered edges only if they are connected to sure edges. This hysteresis thresholding helps in producing clean, continuous edges.
import cv2
import matplotlib.pyplot as plt
import numpy as np

# Continued from previous block - requires the 'originalᵢmage' variable
# Also requires 'grayᵢmage' from section 23 if you want to apply Canny on grayscale

if 'originalᵢmage' in locals() and originalᵢmage is not None:
    # Convert to grayscale if not already done (Canny works best on grayscale)
    if 'grayᵢmage' not in locals():
        grayᵢmage = cv2.cvtColor(originalᵢmage, cv2.COLOR_BGR2GRAY)

    # Apply Canny edge detection
    # threshold1 and threshold2 are for hysteresis procedure
    # A good rule of thumb is to set threshold2 to 2-3 times threshold1
    edges = cv2.Canny(grayᵢmage, 100, 200)

    # Display original grayscale and edge-detected images
    plt.figure(figsize=(10, 5))

    plt.subplot(1, 2, 1)
    plt.imshow(grayᵢmage, cmap='gray')
    plt.title('Grayscale Image')
    plt.axis('off')

    plt.subplot(1, 2, 2)
    plt.imshow(edges, cmap='gray')
    plt.title('Canny Edge Detection')
    plt.axis('off')

    plt.show()
else:
    print("Original image not loaded. Please run the previous blocks first.")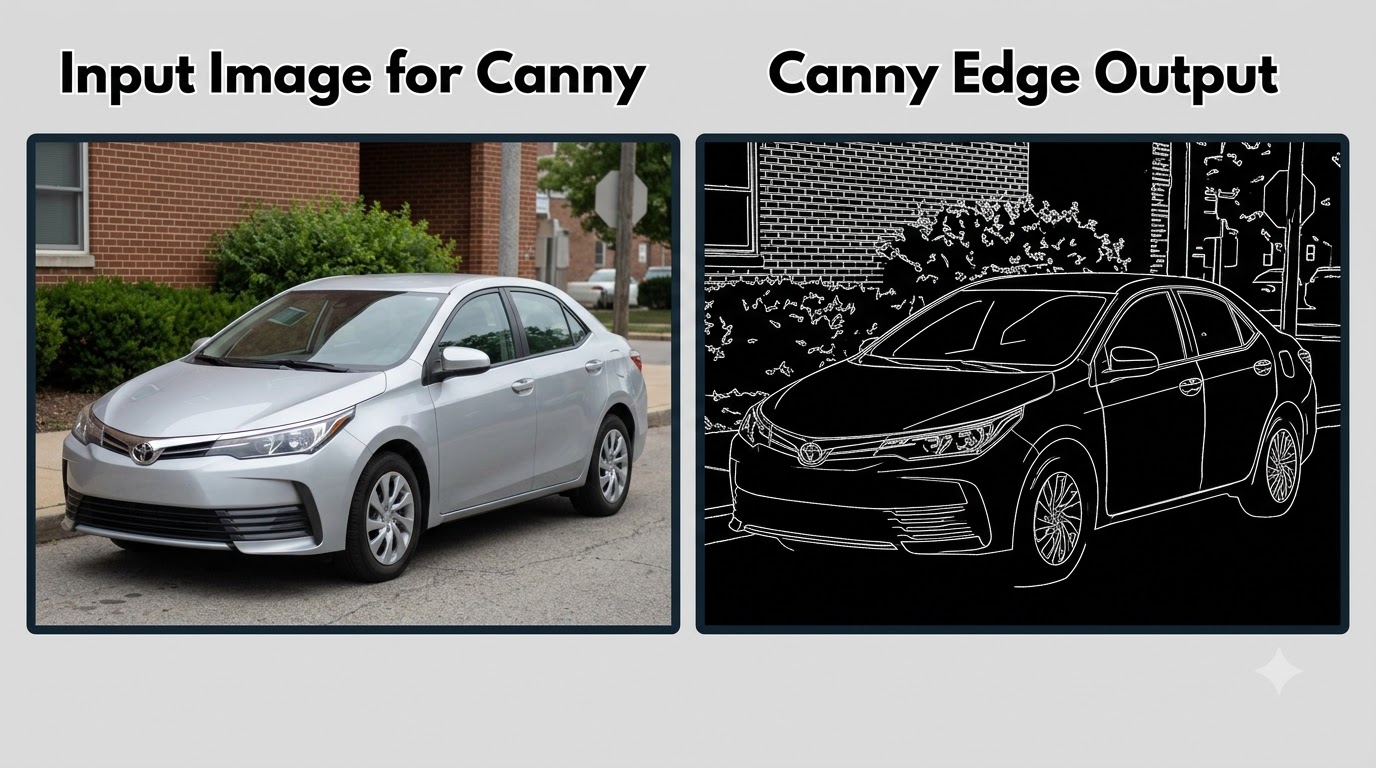
Visualizing intermediate and final results is crucial for debugging and understanding the effects of different processing steps. Matplotlib provides excellent tools for this.
After processing, you might want to save the enhanced image for further use or as the final output. OpenCV's imwrite function allows you to save images to various file formats.
import cv2
import matplotlib.pyplot as plt
import numpy as np

# Continued from previous blocks - requires 'originalᵢmage', 'grayᵢmage', 'blurredᵢmage', 'edges'

if all(var in locals() and locals()[var] is not None for var in ['originalᵢmage', 'grayᵢmage', 'blurredᵢmage', 'edges']):
    # Prepare images for display (convert BGR to RGB for color images)
    original_rgb = cv2.cvtColor(originalᵢmage, cv2.COLOR_BGR2RGB)
    blurred_rgb = cv2.cvtColor(blurredᵢmage, cv2.COLOR_BGR2RGB)

    # Create a figure to display multiple images
    plt.figure(figsize=(15, 8))

    # Display original image
    plt.subplot(2, 2, 1)
    plt.imshow(original_rgb)
    plt.title('1. Original Image')
    plt.axis('off')

    # Display grayscale image
    plt.subplot(2, 2, 2)
    plt.imshow(grayᵢmage, cmap='gray')
    plt.title('2. Grayscale Image')
    plt.axis('off')

    # Display blurred image
    plt.subplot(2, 2, 3)
    plt.imshow(blurred_rgb)
    plt.title('3. Gaussian Blurred Image')
    plt.axis('off')

    # Display edge-detected image
    plt.subplot(2, 2, 4)
    plt.imshow(edges, cmap='gray')
    plt.title('4. Canny Edges')
    plt.axis('off')

    plt.tight_layout() # Adjust layout to prevent overlap
    plt.show()

    # Save the final processed image (e.g., the edge map)
    output_path = 'processed_edges.png'
    cv2.imwrite(output_path, edges)
    print(f"Processed image saved to {output_path")

    # You can also save other processed images if needed
    # cv2.imwrite('processed_blurred.jpg', blurredᵢmage)
    # cv2.imwrite('processed_grayscale.jpg', grayᵢmage)
else:
print("One or more required image variables are not available. Please run all previous code blocks.")Effective image processing requires more than just applying techniques; it demands a strategic approach. Adhering to best practices can significantly improve results and efficiency.
Always understand your data: know its characteristics, common noise types, and typical lighting conditions. Choose appropriate techniques that directly address the specific challenges of your dataset.
Iterative experimentation is key; rarely does the first attempt yield optimal results. Continuously validate your preprocessing steps by evaluating their impact on downstream model performance, not just visual appeal.
Common pitfalls include over-processing, which can remove valuable information along with noise. Ignoring computational costs, especially for real-time applications, can lead to inefficient systems. Failing to validate preprocessing with actual model performance can result in suboptimal AI.
Image processing is not merely a preliminary step but a critical, foundational discipline for successful computer vision and deep learning applications. It is the unseen force that empowers AI to 'see' clearly.
Mastering these preprocessing techniques directly leads to more accurate, robust, and reliable AI models. By ensuring high-quality input, we enable computers to understand the visual world more effectively.
From enhancing medical scans to guiding autonomous vehicles, the impact of well-executed image processing is profound. It truly is the essential first step towards computer vision mastery.
Image processing focuses on transforming or enhancing an image to improve its quality or extract raw features. Image analysis, on the other hand, involves interpreting the processed image to derive meaningful, quantitative information or make decisions, often using statistical or machine learning methods.
Yes, image processing techniques are directly applicable to video data. A video is essentially a sequence of individual frames (images). Each frame can be processed independently or in conjunction with neighboring frames to achieve effects like noise reduction, stabilization, or object tracking in real-time.
Image processing employs several techniques to mitigate lighting variations. These include histogram equalization (and its adaptive variants), gamma correction, and normalization. Some advanced methods also involve illumination correction models or using color spaces like LAB or HSV, which separate lightness from color components, making them more robust to lighting changes.
Image compression is often a post-processing step, reducing file size for storage or transmission. While not directly enhancing features, it's crucial for managing large datasets. Lossy compression (e.g., JPEG) discards some information, which can impact subsequent processing, while lossless compression (e.g., PNG) retains all original data.
Absolutely. Ethical considerations are paramount. For instance, image enhancement techniques could be used to manipulate evidence. In facial recognition, biases in training data or processing steps can lead to unfair or inaccurate outcomes for certain demographics. Privacy concerns also arise when processing images of individuals without consent. Responsible development requires careful consideration of these impacts.
Deep learning models, especially Convolutional Neural Networks (CNNs), often integrate image processing implicitly within their architecture. The initial layers of a CNN can learn to perform tasks akin to edge detection or feature enhancement. However, explicit preprocessing (like resizing, normalization, or data augmentation) is still crucial before feeding images into these networks to ensure consistency and improve training efficiency.
Unlock the power of YOLO! Learn how this revolutionary real-time object detection system works, its architecture, evolution, and diverse applications
Master YOLOv9 object tracking with our comprehensive guide. Explore setup, implementation, optimization, and performance comparisons using Python code.
Master Computer Vision fundamentals with our comprehensive guide, covering core concepts, Python/OpenCV environment setup, and basic image processing.